
Docker has become an essential tool in every web developer’s toolkit. Whether building microservices, deploying applications to the cloud, or simply ensuring consistent development environments across teams, I’ve found that understanding Docker is no longer optional. In this guide, I cover everything you need to go from Docker beginner to confidently containerizing web applications.
What is Docker and Why Does it Matter?

Docker is a platform that packages applications and their dependencies into standardized units called containers. Unlike traditional virtual machines that virtualize entire operating systems, containers share the host system’s kernel while maintaining isolation between applications.
For web developers, I’ve seen this translate to:
- Consistent environments across development, staging, and production
- Faster onboarding for new team members
- Simplified deployment to any infrastructure that runs Docker
- Better resource utilization compared to virtual machines
- Easier scaling of application components independently
The days of “it works on my machine” are over. When an application runs in a Docker container, it runs the same way everywhere.
Installing Docker
Windows and macOS
Docker Desktop provides the easiest installation experience for Windows and macOS users. The installer includes Docker Engine, Docker CLI, Docker Compose, and a graphical interface for managing containers.
After installation, verify everything works by opening a terminal and running:
docker --version
docker run hello-world
Linux
On Linux distributions, install Docker Engine directly. For Ubuntu:
sudo apt-get update
sudo apt-get install docker-ce docker-ce-cli containerd.io docker-buildx-plugin docker-compose-plugin
Add your user to the docker group to run commands without sudo:
sudo usermod -aG docker $USERLog out and back in for the group change to take effect.
Core Docker Concepts
I find understanding these fundamental concepts essential before diving deeper.
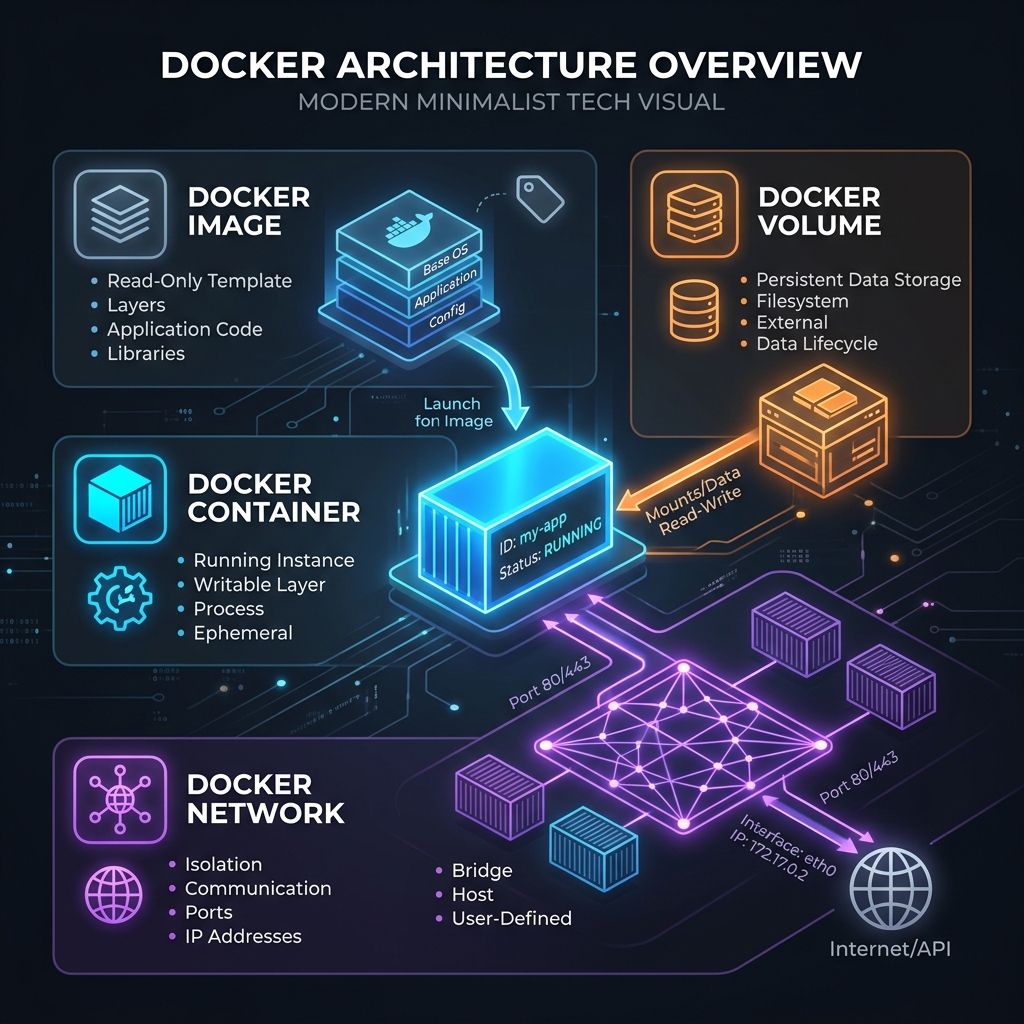
Images
An image is a read-only template containing instructions for creating a container. Think of it as a snapshot of an application with all its dependencies, libraries, and configuration files. Images are built from Dockerfiles and can be stored in registries like Docker Hub.
Containers
A container is a running instance of an image. Multiple containers can be created from the same image, each isolated from the others. Containers are ephemeral by default, meaning any data written inside them is lost when they stop unless explicitly persisted.
Volumes
Volumes provide persistent storage for container data. They exist independently of containers and can be shared between multiple containers. For web applications, volumes commonly store database files, uploaded media, and configuration.
Networks
Docker networks enable communication between containers. Multiple network types exist, but bridge networks are most common for local development. Containers on the same network can communicate using container names as hostnames.
Writing Your First Dockerfile
A Dockerfile contains instructions for building an image. Here’s a practical example I use for a Node.js web application:
# Use an official Node.js runtime as the base image
FROM node:20-alpine

# Set the working directory inside the container
WORKDIR /app

# Copy package files first for better layer caching
COPY package*.json ./

# Install dependencies
RUN npm ci --only=production

# Copy the rest of the application code
COPY . .

# Expose the port the app runs on
EXPOSE 3000

# Define the command to run the application
CMD ["node", "server.js"]
Build and run this image with:
docker build -t my-node-app .
docker run -p 3000:3000 my-node-app
The application is now accessible at http://localhost:3000.
Multi-Stage Builds for Smaller Images
I always aim for production images to be as small as possible. Multi-stage builds allow using one image for building and another for running, dramatically reducing final image size.
Here’s an example I use for a React application:
# Build stage
FROM node:20-alpine AS builder
WORKDIR /app
COPY package*.json ./
RUN npm ci
COPY . .
RUN npm run build

# Production stage
FROM nginx:alpine
COPY --from=builder /app/build /usr/share/nginx/html
EXPOSE 80
CMD ["nginx", "-g", "daemon off;"]
This approach separates build dependencies from runtime dependencies. The final image contains only nginx and the compiled static files, not the Node.js runtime or npm packages.
For a Python Django application:
# Build stage
FROM python:3.12-slim AS builder
WORKDIR /app
RUN python -m venv /opt/venv
ENV PATH="/opt/venv/bin:$PATH"
COPY requirements.txt .
RUN pip install --no-cache-dir -r requirements.txt

# Production stage
FROM python:3.12-slim
WORKDIR /app
COPY --from=builder /opt/venv /opt/venv
ENV PATH="/opt/venv/bin:$PATH"
COPY . .
EXPOSE 8000
CMD ["gunicorn", "--bind", "0.0.0.0:8000", "myproject.wsgi:application"]
Docker Compose for Multi-Container Applications
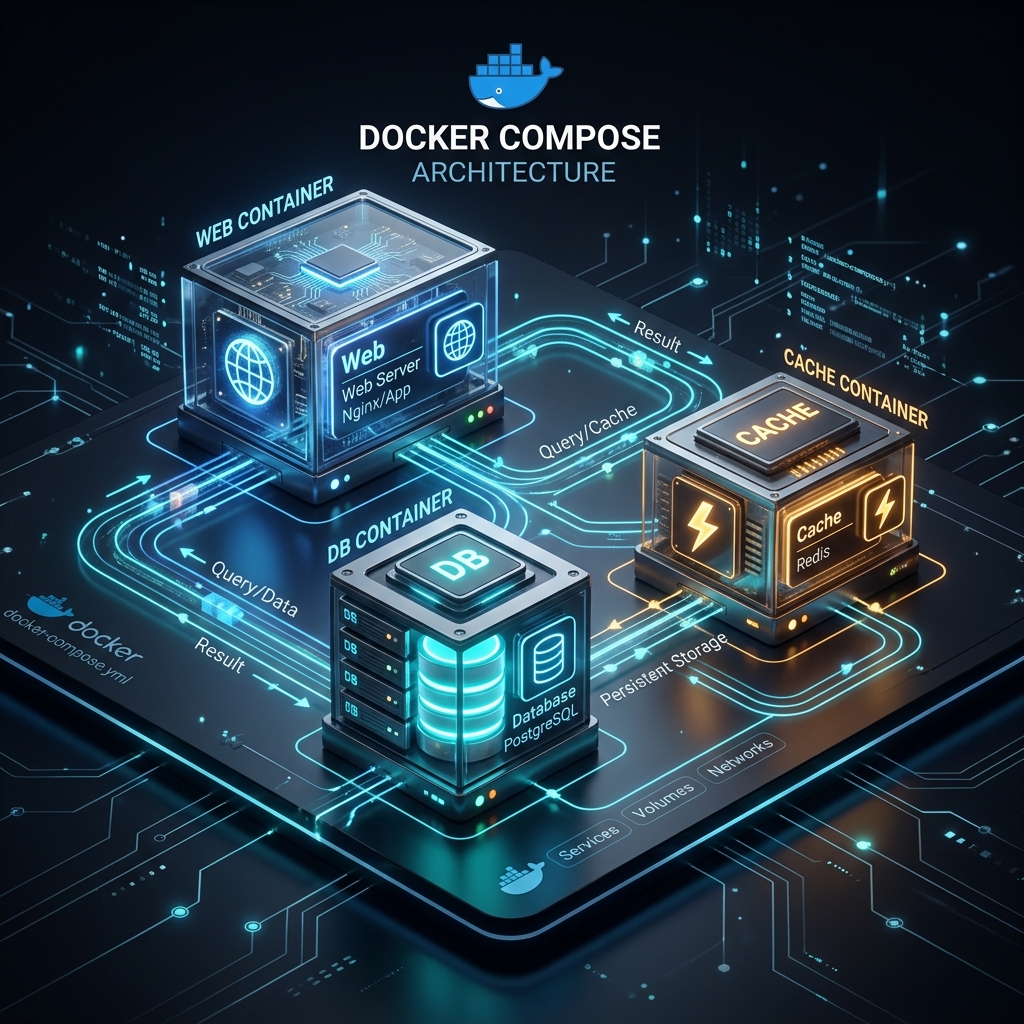
Most web applications I build require multiple services: a web server, database, cache, and perhaps a message queue. Docker Compose defines and runs multi-container applications with a single YAML file.
Here’s a complete example I use for a web application with PostgreSQL and Redis:
version: '3.8'

services:
  web:
    build: .
    ports:
      - "3000:3000"
    environment:
      - DATABASE_URL=postgresql://user:password@db:5432/myapp
      - REDIS_URL=redis://cache:6379
    depends_on:
      - db
      - cache
    volumes:
      - .:/app
      - /app/node_modules

  db:
    image: postgres:16-alpine
    environment:
      POSTGRES_USER: user
      POSTGRES_PASSWORD: password
      POSTGRES_DB: myapp
    volumes:
      - postgres_data:/var/lib/postgresql/data

  cache:
    image: redis:7-alpine
    volumes:
      - redis_data:/data

volumes:
  postgres_data:
  redis_data:
Start all services with a single command:
docker compose up -dStop and remove everything:
docker compose downOptimizing Docker Images
Image optimization affects build times, storage costs, and deployment speed. I follow these practices for efficient images.
Use Minimal Base Images
Alpine-based images are significantly smaller than their Debian counterparts. When possible, I use images tagged with -alpine or -slim:
# Better: ~50MB
FROM node:20-alpine

# Avoid: ~350MB
FROM node:20
For even smaller images, consider distroless images from Google that contain only the application and its runtime dependencies.
Leverage Build Cache
Docker caches each instruction in a Dockerfile. Order instructions from least to most frequently changing:
# Good: Dependencies change less often than code
COPY package*.json ./
RUN npm ci
COPY . .

# Bad: Invalidates cache on every code change
COPY . .
RUN npm ci
Use .dockerignore
Create a .dockerignore file to exclude unnecessary files from the build context:
node_modules
.git
.gitignore
*.md
.env
.env.*
Dockerfile
docker-compose.yml
.dockerignore
tests
coverage
This reduces build context size and prevents accidentally including sensitive files.
Clean Up in the Same Layer
Combine commands that create and remove temporary files:
# Good: Cleanup happens in the same layer
RUN apt-get update && \
    apt-get install -y --no-install-recommends some-package && \
    rm -rf /var/lib/apt/lists/*

# Bad: Cleanup creates a new layer, files still exist in previous layer
RUN apt-get update
RUN apt-get install -y some-package
RUN rm -rf /var/lib/apt/lists/*
Container Security Best Practices
I believe security should be built into containerized applications from the start, not added as an afterthought.
Never Run as Root
I always create and use a non-root user in my Dockerfiles:
FROM node:20-alpine

# Create app user
RUN addgroup -S appgroup && adduser -S appuser -G appgroup

WORKDIR /app
COPY --chown=appuser:appgroup . .

# Switch to non-root user
USER appuser

CMD ["node", "server.js"]
Scan Images for Vulnerabilities
I integrate vulnerability scanning into my workflow. Tools like Trivy and Docker Scout identify known vulnerabilities in base images and dependencies:
trivy image my-node-app:latestRun scans in CI/CD pipelines to catch vulnerabilities before deployment.
Pin Image Versions
I always specify exact versions for reproducible builds:
# Good: Reproducible
FROM node:20.10.0-alpine3.19

# Risky: Could change unexpectedly
FROM node:latest
Handle Secrets Properly
I never embed secrets in images. Instead, I use environment variables, Docker secrets, or external secret management tools:
# docker-compose.yml
services:
  web:
    image: my-app
    secrets:
      - db_password

secrets:
  db_password:
    file: ./secrets/db_password.txt
Health Checks
I configure health checks to allow Docker to monitor container status and automatically restart unhealthy containers:
HEALTHCHECK --interval=30s --timeout=10s --start-period=5s --retries=3 \
  CMD curl -f http://localhost:3000/health || exit 1
For applications without curl, use wget or a dedicated health check script:
HEALTHCHECK CMD node healthcheck.jsDebugging Containers
When things go wrong, these are the commands I use to diagnose issues.
View Container Logs
docker logs container_name
docker logs -f container_name  # Follow logs in real-time
Execute Commands in Running Containers
docker exec -it container_name sh
docker exec container_name ls -la /app
Inspect Container Details
docker inspect container_name
docker stats  # Resource usage for all containers
View Running Processes
docker top container_nameProduction Deployment Considerations
Deploying containers to production requires additional considerations beyond local development. Here’s what I focus on.
Container Orchestration
For applications running multiple container instances, orchestration tools manage deployment, scaling, and failover. Kubernetes is the industry standard, though simpler options like Docker Swarm may suffice for smaller deployments.
Logging and Monitoring
Configure logging drivers to aggregate logs from all containers:
services:
  web:
    logging:
      driver: "json-file"
      options:
        max-size: "10m"
        max-file: "3"
Integrate monitoring tools like Prometheus and Grafana to track container metrics.
Resource Limits
Prevent containers from consuming excessive resources:
services:
  web:
    deploy:
      resources:
        limits:
          cpus: '0.5'
          memory: 512M
        reservations:
          cpus: '0.25'
          memory: 256M
Rolling Updates
Use rolling updates to deploy new versions without downtime:
docker compose up -d --no-deps --build webWith orchestration tools, rolling updates happen automatically with configurable strategies.
Common Docker Commands Reference
Here’s my quick reference for frequently used commands:
# Images
docker build -t name:tag .
docker images
docker rmi image_name
docker pull image_name

# Containers
docker run -d -p 3000:3000 --name myapp image_name
docker ps
docker ps -a  # Include stopped containers
docker stop container_name
docker rm container_name

# Logs and debugging
docker logs container_name
docker exec -it container_name sh

# Cleanup
docker system prune  # Remove unused data
docker volume prune  # Remove unused volumes
docker image prune   # Remove unused images
Next Steps
Mastering Docker opens doors to modern deployment practices and infrastructure patterns. After becoming comfortable with the basics I’ve covered here, I recommend exploring:
- Kubernetes for orchestrating containers at scale
- CI/CD integration for automated building and deployment
- Container registries for hosting private images
- Service mesh technologies for microservices communication
Docker documentation and the official Docker curriculum provide excellent resources for continued learning. In my experience, the key is practice. Start containerizing real projects, encounter real problems, and build real solutions.
Containers have fundamentally changed how applications are built, shipped, and run. I’ve found that investing time in understanding Docker deeply pays dividends throughout a development career.