
MCP servers turn your AI assistant from a chatbot into a tool that can actually do things. Search the web, query a database, manage GitHub repos, control a browser. The Model Context Protocol makes this possible, but getting servers installed and configured is still harder than it should be.
This guide covers two approaches: the fast way with a VS Code extension, and the manual way for when you need full control. By the end, you will have MCP servers running in Claude Desktop, Cursor, Cline, or Devin (formerly Windsurf).
What MCP Servers Actually Do
An MCP server is a small program that exposes tools to your AI client through a standardized protocol. When you ask Claude to “search my codebase for unused functions,” an MCP server with filesystem access makes that possible. Without it, the AI has no way to read your files.
Common MCP server types include:
- Filesystem - Read, write, and search local files
- GitHub - Create issues, read repos, manage pull requests
- Browser - Move through websites, take screenshots, extract data
- Database - Run SQL queries against PostgreSQL, SQLite, and others
- Search - Query Brave, Google, or internal knowledge bases
- Memory - Store conversation context across sessions
Each server runs as a separate process. Your AI client communicates with it over stdio or HTTP. The client does not need to know how the server works internally, only what tools it exposes.
Where Config Files Live
Every MCP client stores its server configuration in a different location. This is the first friction point most developers hit.
| Client | Config file path |
|---|---|
| Claude Desktop | ~/Library/Application Support/Claude/claude_desktop_config.json (macOS) |
| Cursor | ~/.cursor/mcp.json |
| Cline | ~/Library/Application Support/Code/User/globalStorage/saoudrizwan.claude-dev/settings/cline_mcp_settings.json (macOS) |
| Devin (formerly Windsurf) | ~/.codeium/devin (formerly windsurf)/mcp_config.json |
These files follow the same JSON structure. A minimal config with one server looks like this:
{
  "mcpServers": {
    "github": {
      "command": "npx",
      "args": ["-y", "@modelcontextprotocol/server-github"],
      "env": {
        "GITHUB_PERSONAL_ACCESS_TOKEN": "ghp_xxxxxxxxxxxx"
      }
    }
  }
}
The command field tells the client how to start the server. The args array passes arguments. The env object sets environment variables the server needs. Some servers require no environment variables at all. Others need API keys, database connection strings, or file paths.
The Manual Method
If you prefer to understand every piece of your setup, install servers manually.
Step 1: Find a Server
The VePrompts MCP directory lists 90+ curated servers with compatibility info, required environment variables, and tool descriptions. Each entry shows which clients the server works with and what setup is involved.
Step 2: Install the Server Package
Most servers distribute through npm. Open a terminal and run the install command from the server’s documentation:
npm install -g @modelcontextprotocol/server-githubSome servers use npx and do not need a global install. The server runs fresh each time your client starts it.
Step 3: Edit Your Config File
Open your client’s config file in a text editor. Add the server entry under mcpServers, using the exact command and arguments from the documentation. Set any required environment variables. Save the file.
Step 4: Restart Your Client
The client reads the config file at startup. Close and reopen Claude Desktop, Cursor, Cline, or Devin (formerly Windsurf). The new server should appear in the client’s MCP tools list.
Common Manual Setup Errors
- Invalid JSON - A trailing comma or missing brace will prevent the client from loading any servers. Use a JSON validator before saving.
- Wrong env var names - The GitHub server expects
GITHUB_PERSONAL_ACCESS_TOKEN, notGITHUB_TOKENorGH_TOKEN. Check the documentation. - Command not found - If the server uses a globally installed package, make sure it is in your PATH. If it uses npx, verify Node.js is installed.
- Permission denied - Some servers need file system access. On macOS, you may need to grant permissions in System Preferences.
The Fast Way: 1 Click MCP Installer By VePrompts for VS Code
Manual setup works, but it is repetitive. You look up the same commands, copy the same JSON patterns, and troubleshoot the same syntax errors every time you add a server.
The 1 Click MCP Installer By VePrompts extension is now live on the VS Code Marketplace. It detects your installed clients, shows curated servers in a tree view, and writes valid config automatically.
![]()
The extension adds a plug icon to your VS Code activity bar. Click it to open the MCP Installer panel.
What the Extension Handles
- Client detection - Scans for Claude Desktop, Cursor, Cline, and Devin (formerly Windsurf) installations
- Config file location - Writes to the correct path for each detected client
- Environment variable prompts - Asks for required API keys securely, never hardcodes them
- JSON validation - Ensures the output is valid before writing
- Copy config fallback - Copies a complete JSON snippet for manual pasting when you prefer control
Installing the Extension
- Open VS Code
- Go to Extensions (Ctrl+Shift+X)
- Search for “1 Click MCP Installer By VePrompts” or click Install from Marketplace
- Click Install
Installing Your First Server
- Click the VePrompts MCP icon in the activity bar
- Browse categories or search by name
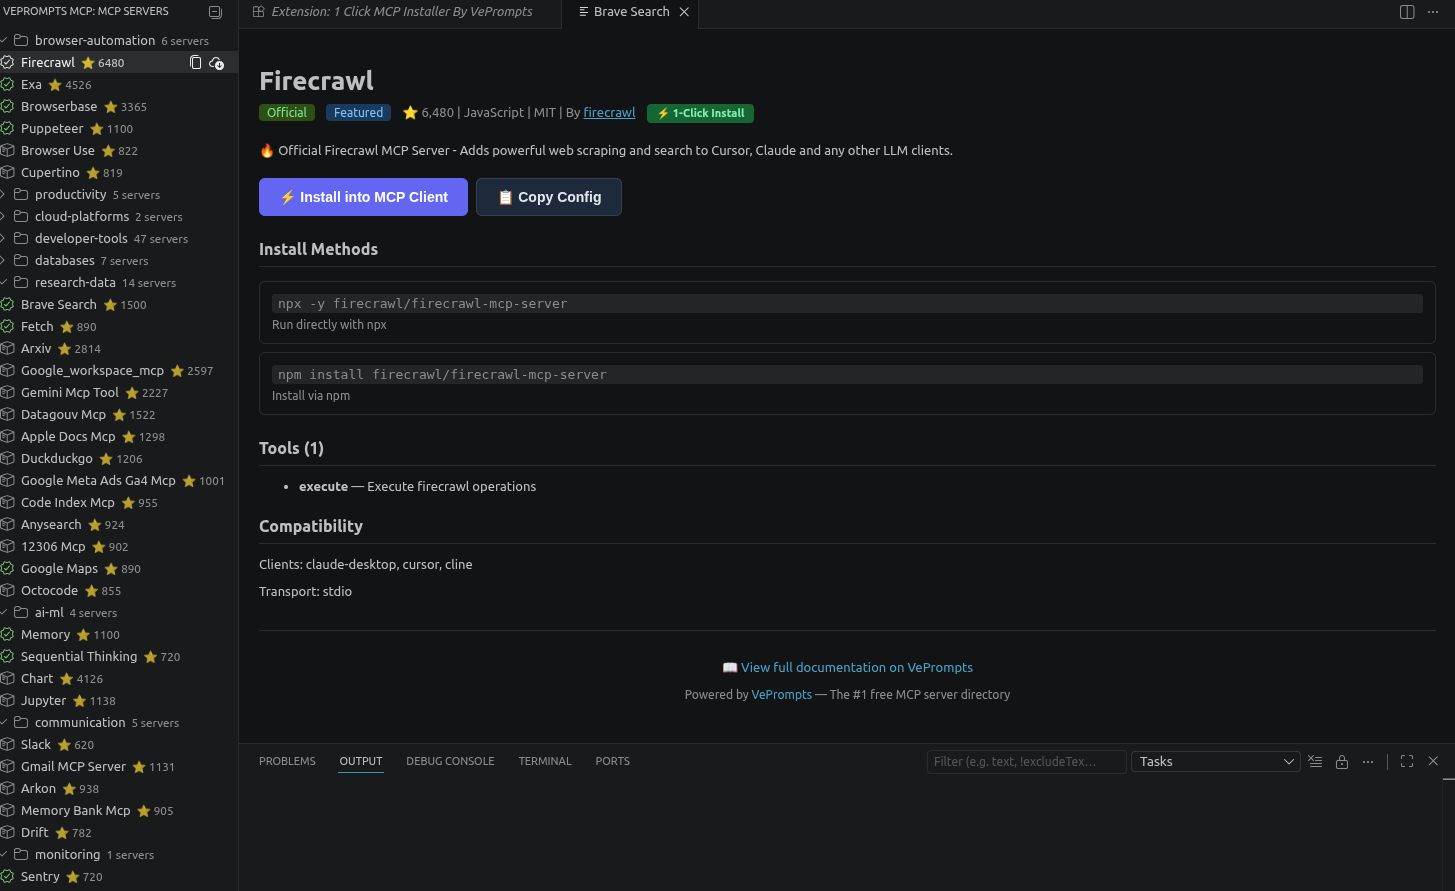
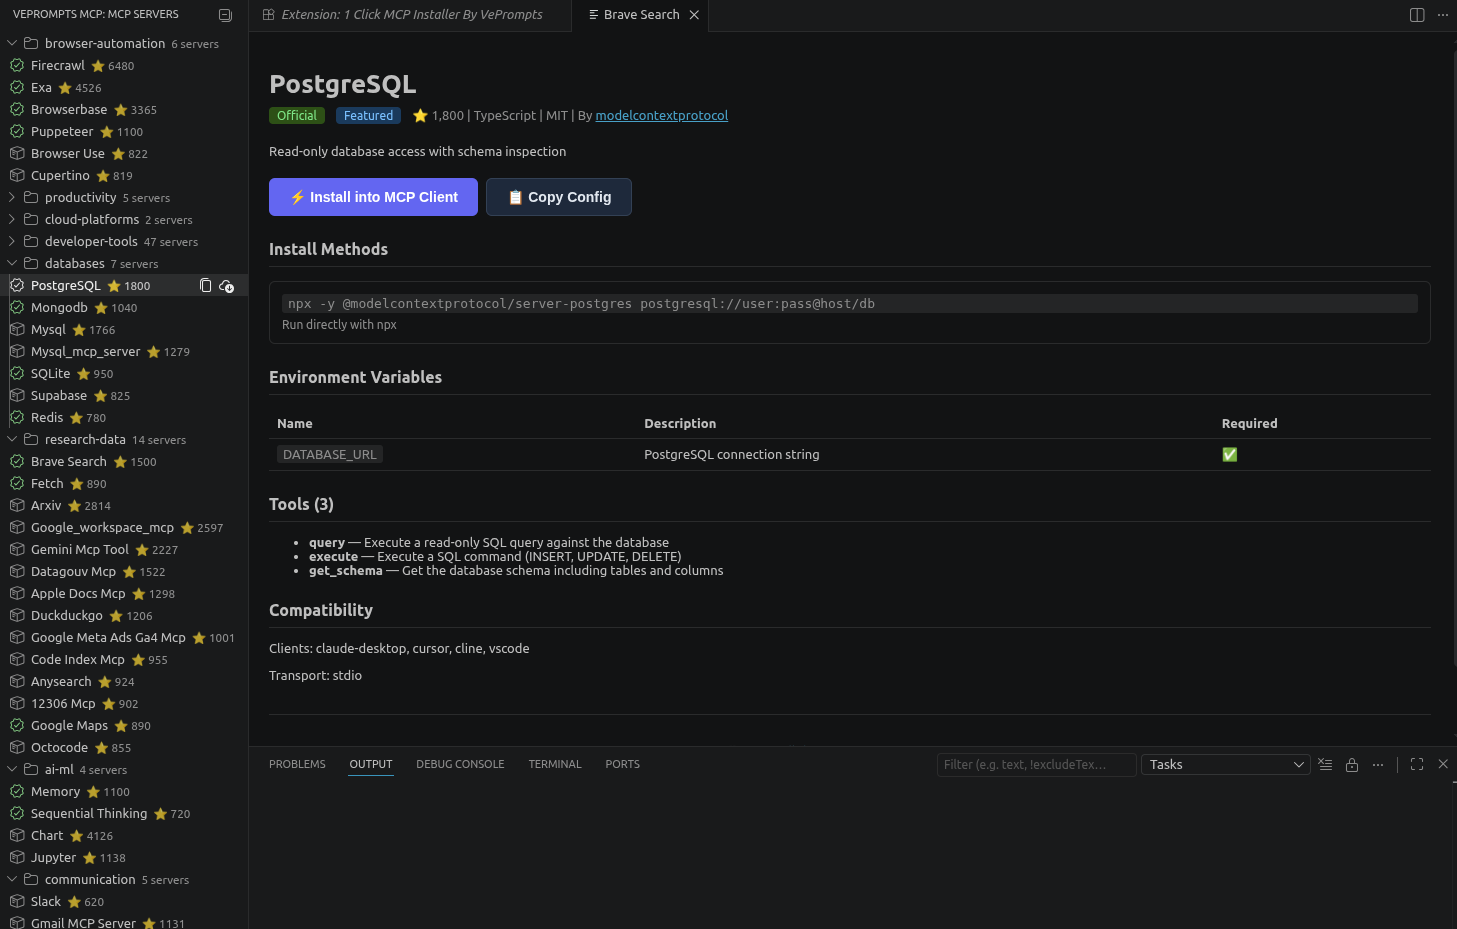
The tree view organizes servers by category. Installed servers show a checkmark. Click any server to see its details.
- Click a server to open its detail panel
- Review the tools it exposes and any required environment variables
- Click Install (or Copy Config if you prefer manual control)
- Enter any API keys when prompted
The extension securely prompts for required environment variables and writes the config atomically.
- Restart your AI client
Servers with no required environment variables install in one click. The extension handles the JSON, the file path, and the formatting.
Searching Servers
Open the Command Palette (Ctrl+Shift+P) and run “VePrompts: Search MCP Servers”. Type a keyword, tag, or description fragment. Results filter in real time.
Copying Config Without Installing
Click Copy Config on any server to get a complete JSON snippet, including placeholder values for environment variables. This is useful when:
- You want to review the config before the extension writes it
- You are setting up a server on a different machine
- Your client is not auto-detected but you know the config file location
- You need to modify the config beyond what the extension generates
Choosing Between Manual and Extension Setup
| Situation | Use manual | Use extension |
|---|---|---|
| Learning how MCP works | Yes | No |
| One server, one client | Either | Either |
| Trying multiple servers quickly | No | Yes |
| Custom config modifications | Yes | No |
| Team sharing standard configs | Yes | No |
| Avoiding syntax errors | No | Yes |
| Managing 5+ servers | No | Yes |
The extension does not replace understanding. It removes repetitive steps so you can focus on what the servers actually do.
Verifying Your Setup
After installing a server, verify it is working before relying on it.
- Open your AI client
- Start a new conversation
- Ask the AI to use a tool from the server. For the GitHub server, try: “List my recent GitHub issues”
- The AI should invoke the MCP tool and return real data
If the tool fails, check the client’s error output. Common causes:
- The server process crashed on startup (check the config JSON)
- An environment variable is missing or incorrect
- The server package is not installed or not in PATH
- The client does not support the server’s transport method
Keeping Servers Updated
MCP servers evolve. New tools get added, bugs get fixed, and environment variable requirements change.
The 1 Click MCP Installer By VePrompts bundles a curated snapshot of the directory. For the latest server listings and compatibility notes, check the VePrompts MCP directory periodically.
For manually installed servers, subscribe to the server’s npm package or GitHub repository for update notifications.
Next Steps
Start with one server that solves a real problem in your workflow. If you manage GitHub repos daily, install the GitHub MCP server. If you research web content constantly, install the browser server. One working server is more valuable than ten installed but unused ones.
Once you understand how one server works, adding others is straightforward. The config pattern is the same. The environment variables differ. The tools expand what your AI can do.
For a curated starting point, install the 1 Click MCP Installer By VePrompts from the VS Code Marketplace or browse the full MCP server directory.